

Final Fantasy XIII Cheats
Get the Super Star achievement.
Submitted By: Kittan Bachika
Submitted By: Kittan Bachika
Complete the game then get it at the extras in the main menu.
Submitted By: Kittan Bachika
Submitted By: Kittan Bachika
Get the L'Cie Paragon achievement to have it unlocked in the extras menu.
Submitted By: Kittan Bachika
Submitted By: Kittan Bachika
Get the Treasure Hunter achievement.
Submitted By: kittan Bachika
Submitted By: kittan Bachika
Often, when fighting big enemies with a huge HP bar, Stagger is indispensable. But a lot of times, it's hard to get the chain gauge started, especially on weaker enemies, because their Stagger goes back down to 100% very fast. The way to keep it going up takes a little practice, but will be very handy in finishing fights fast. First, it is necessary to make all of your party members go into commando or ravager (this is usually labeled Relentless Attack or something of the likes in the Paragdim menu). Then, go to auto-attack, and attack your desired enemy. Then, go auto-attack again, but instead of attacking right away, highlight the enemy, but do not push X. Wait until your other party members finish their attacks, and then launch yours. After that, keep attacking as fast as you can. This times your party's attacks so that there is a continuous stream of attacks as opposed to a lot of attacks at once. So whenever the chain starts to go down, another attack forces it to go up, thus stopping it from resetting to 100%. As the Chain Gauge gets higher, it takes longer to reset, so you can afford taking a bit of damage from other enemies. In Stagger, the enemy will often not move, but bigger foes will. What Stagger really does is knocks down all of the enemies defenses and makes them very vulnerable to any attack. The instant you get to the Stagger percentage, a big flash will announce Stagger, and your enemy will glow yellow. Any enemy that is Staggered will also have their name appear in a yellow capsule when you have to select a target for an attack as opposed to a blue one. When Stagger is activated, the Chain Gauge bar doubles as a timer. The bar is filled to start, and slowly depletes. When the bar is completely gone, Stagger has reset. And if the enemy survives until a Stagger reset, then that enemy must be strong, so take advantage of your Medic here (it is advantageous to have both Vanille and Hope as Medics) until your party's health is back up. Then go into Relentless Attack mode again, and achieve Stagger as soon as possible.
Submitted By: Sahil Singh
Submitted By: Sahil Singh
The Eidolons are probably one of the hardest opponents you'll come across, but the good news is, if you beat them, they'll join you as FF13's new summons. Here's how to beat the first two you'll come across.
*note* Each Eidolon fight is set to a certain amount of time portrayed above the character's head. You MUST complete the challenge in that time or you'll have to retry.
Shiva Sisters:
To beat the Shiva sisters, you should have the role "Sentinel" by now. When the Shiva sister leaves herself open, strike while you can. This won't raise her gestalt gauge much, but it will help a little at least.
Then, when you see her throw her hands out and her weapon spins above her head, active Sentinel now. Then, right when she goes to strike, use Guard (or whatever the ability is) to defend from her attack. This will cause the gauge to rise VERY noticeably. Continue this process with good timing, and you'll have the sisters as a your first summon.
Don't worry about the other sister watching the battle. She won't strike, but she will continuously heal you so you can't lose unless you fail to fill the gauge.
*note* Only Snow can summon the sisters, as each character has one summon specific to them.
Odin:
Odin was much easier than the Shiva sisters. All you have to do is make sure you have a paradigm with "Commando" and "Ravager", as he's weak against magic, which the Ravager uses. It wouldn't hurt to occasionally active a paradigm with "Medic" in it, but always make sure you switch back to Ravager as soon as necessary.
In this particular fight, it's okay to attack head on with the Commando, mostly due to your Ravager inflicting great damage with their magical attacks. Synchronize your attacks witht the Ravager just right, and you will claim victory of this Eidolon in just a few minutes at most.
*note* Odin can only be summoned by Lightning.
Submitted By: RadiantKeybladeFantasy
Entry Location:
In battle
While in battle you can get a quick full ATB bar by switching paradigms. You may utilize this for a quick combo while switching to a healing or support paradigm. But remember, it only works on the first switch. Don't keep switching hoping for full ATB gauges.
Submitted By: wutsuphomey
In battle
While in battle you can get a quick full ATB bar by switching paradigms. You may utilize this for a quick combo while switching to a healing or support paradigm. But remember, it only works on the first switch. Don't keep switching hoping for full ATB gauges.
Submitted By: wutsuphomey

Final Fantasy XIII Unlockables
Trophies
Commando's Seal (Bronze): Mastered the Commando role.
Ravager's Seal (Bronze): Mastered the Ravager role.
Sentinel’s Seal (Bronze): Mastered the Sentinel role.
Saboteur's Seal (Bronze): Mastered the Saboteur role.
Synergist's Seal (Bronze): Mastered the Synergist role.
Medic's Seal (Bronze): Mastered the Medic role.
Limit Breaker(Silver): Dealt 100,000+ damage with a single attack.
Adamant Will (Silver): Felled a heavyweight of the lowerworld wilds.
Master's Seal (Silver): Fully developed all characters.
Treasure Hunter (Gold): Held every weapon and accesory.
Instrument of Fate (Bronze): Took the first steps toward challenging an unjust fate.
Instrument of Dissent (Bronze): Survived the Purge to confront a greater peril.
Instrument of Tragedy (Bronze): Strode into danger's den and paid the consequences.
Instrument of Flight (Bronze): Slipped through the net and lived to fight another day.
Instrument of Vengeance (Bronze): Resolved to be more than a victim of circumstance.
Instrument of Survival (Bronze): Evaded pursuers, though memories of the past still gave chase.
Instrument of Rebellion (Bronze): Made plans to infiltrate enemy-occupied territory.
Loremaster (Gold): Discerned the full attributes of 100 enemies.
Secret Trophies: 25 (24 Including Platinum trophy)
Submitted By: GamesRadar
Final Fantasy XIII Hints
Staggering Enemies
If you want to stagger your enemy's quickly use this little trick: Always hit them with relentless assault first till you get the stagger meter up to about 30 % after that the chain gauge will fall slower.
Then switch to dualcasting which drives the chain gauge up must faster. When you need to heal use a paradine like War and Peace to keep one member attacking keeping the chain gauge up. Once you have staggered your enemy switch back to relentless assault this drains the HP much quicker than dualcasting.
On stronger enemies it's a good idea to cast libra or use a librascope on them so your AI characters use the most effective attacks. Using this method will take out just about any enemy. The exception is on enemy's that are immune to physical attacks, use the same method to drive up the chain gauge just don't switch back to relentless assault after stagger just keep casting away.
Submitted By: Jcuzzen
Destero
Entry Location:
When facing "Bart"
When facing "Bart" and he uses his Destero power, all out attack him until he staggers during the "power-up" phase. The Destero power will only hit for half, and not leave your party close the death.
Submitted By: Crazy B
When facing "Bart"
When facing "Bart" and he uses his Destero power, all out attack him until he staggers during the "power-up" phase. The Destero power will only hit for half, and not leave your party close the death.
Submitted By: Crazy B
Easy Stagger Fill
Entry Location:
Battle
To get the enemy's stagger bar up easily, have your battle formations as... commando/ravager/ravager. Summons also set the stagger bar up fast, however when the summon exits the battle the stagger bar resets.
Submitted By: russell7ps3
Battle
To get the enemy's stagger bar up easily, have your battle formations as... commando/ravager/ravager. Summons also set the stagger bar up fast, however when the summon exits the battle the stagger bar resets.
Submitted By: russell7ps3
CP Farming
Entry Location:
Large Areas with at least 3 Different battles
This is a self explanatory. All you have to do is kill the first set of enemies and run to the second. After killing the second set obviously kill the third. After that the first should be back on the map.
*Note : The way i learned of this method was with Lightning and Hope just before the battle with Odin.
Submitted By: OneWhoDoesntLikeFF7
forging ultima weapon lightning
when get the Lionheart weapon for Lightning, level it up to maximum. Used 20 fragrant oil for minor xp boost, and 1 Ultimate Reactor (which you can buy for 50000 gil at the R&D shop section later in the game) to instantly level it from 1 to max level. The reactor gives a standard 44000 xp. Next use a Scarletite to transform the Lionheart, into a level 15 Ultima weapon.
Submitted By: peter&peter
Submitted By: peter&peter
Make your character dizzy
Whenever you have control of your character outside of battle, move the analog stick left and right quickly. Do this enough (6 or so times) and your character will come to an abrupt stop and emote -- expressing anger or fatigue.
Submitted By: SonMarIkeShad
Submitted By: SonMarIkeShad
Eidolon Battles
Eidolon: SHIVA
Character: SNOW
Chapter: 03
Strategy: In order to impress Shiva, switch the Paradigm Shift to Sentinel. Have Snow use Steel Guard all the time and wait for the Gestalt Meter to fill up. Don’t worry about your health because Striria (Sister of Nix) will heal you.
Eidolon - ODIN
Character: LIGHTNING
Chapter: 04
Strategy: This is one of the hardest fights you will encounter so far as Odin is fast and deadly. Before entering the battle, make sure that you changed your Battle Speed under Settings to Slow. The key to fill up the Gestalt Meter fast is when Odin sees a lot of healing and chaining up your attacks. Start off with Hope casting Protect and Shell then change the Paradigm Shift to Dual Casting allowing both Lightning and Hope cast magics. When you see one of your characters HP is low, switch to Yin & Yang Paradigm to allow Hope heal Lightning while she’s still attacking with a magic.
Eidolon: BRYNHILDR
Character: SAHZ
Chapter: 08
Strategy: Start off by having the characters switch their Paradigm to Saboteur and Synergiest. Have either of the two cast Vigilance and Haste. If the HP runs low on either of the characters, change the Paradigm to War & Peace to have one of the characters use Cura or Cure. The main key to this battle is to chain up the Chain Gauge. Do it by always focusing on Dual Casting Paradigm to have both characters attack with magic (Ravager).
Eidolan: BAHAMUT
Character: Fang
Chapter: 10
Strategy: Making a pact with Bahamut is a very challenging one as it attacks rampantly.Focus
on the health of your party. I suggest to have someone in your party cast Shell and Protect to lessen the damage that you get from Bahamut. Start off by debuffing Bahamut. Have one of your party be a Sentinel (preferably Fang) and the two becomes a Ravager. Keep on attacking Bahamut until the Gestalt Gault fills up
Eidolon: ALEXANDER
Character: Hope
Chapter: 11
Strategy: Make sure Hope has a lot of HP by this time as he will be the Party leader. Start off the battle with Alexander by shifting to Delta Attack Paradigm. Have Fang be the Sentinel while Hope and Lightning do the attack. When you see the party’s HP drop significantly, switch to Combat Clinic Paradigm to do the healing. Keep on doing it this until the Gestalt Meter fills up.
Eidolon: HECATONCHEIR
Character: Vanille
Chapter: 11
Strategy: With only Vanille and Fang fighting this Eidolon Battle, it can be tough. Start off the fight by having Vanille be the Ravanger and Fang be the Sentinel. Keep attacking Hecatoncheir with Vanille’s Magic and watch his Chain Gauge goes up. When the HP runs low, change to a Medic Paradigm and have Vanille heal and switch back to the first strategy. Keep on doing this and the Gestalt Meter will go up
Submitted By: CMC1988
Character: SNOW
Chapter: 03
Strategy: In order to impress Shiva, switch the Paradigm Shift to Sentinel. Have Snow use Steel Guard all the time and wait for the Gestalt Meter to fill up. Don’t worry about your health because Striria (Sister of Nix) will heal you.
Eidolon - ODIN
Character: LIGHTNING
Chapter: 04
Strategy: This is one of the hardest fights you will encounter so far as Odin is fast and deadly. Before entering the battle, make sure that you changed your Battle Speed under Settings to Slow. The key to fill up the Gestalt Meter fast is when Odin sees a lot of healing and chaining up your attacks. Start off with Hope casting Protect and Shell then change the Paradigm Shift to Dual Casting allowing both Lightning and Hope cast magics. When you see one of your characters HP is low, switch to Yin & Yang Paradigm to allow Hope heal Lightning while she’s still attacking with a magic.
Eidolon: BRYNHILDR
Character: SAHZ
Chapter: 08
Strategy: Start off by having the characters switch their Paradigm to Saboteur and Synergiest. Have either of the two cast Vigilance and Haste. If the HP runs low on either of the characters, change the Paradigm to War & Peace to have one of the characters use Cura or Cure. The main key to this battle is to chain up the Chain Gauge. Do it by always focusing on Dual Casting Paradigm to have both characters attack with magic (Ravager).
Eidolan: BAHAMUT
Character: Fang
Chapter: 10
Strategy: Making a pact with Bahamut is a very challenging one as it attacks rampantly.
Eidolon: ALEXANDER
Character: Hope
Chapter: 11
Strategy: Make sure Hope has a lot of HP by this time as he will be the Party leader. Start off the battle with Alexander by shifting to Delta Attack Paradigm. Have Fang be the Sentinel while Hope and Lightning do the attack. When you see the party’s HP drop significantly, switch to Combat Clinic Paradigm to do the healing. Keep on doing it this until the Gestalt Meter fills up.
Eidolon: HECATONCHEIR
Character: Vanille
Chapter: 11
Strategy: With only Vanille and Fang fighting this Eidolon Battle, it can be tough. Start off the fight by having Vanille be the Ravanger and Fang be the Sentinel. Keep attacking Hecatoncheir with Vanille’s Magic and watch his Chain Gauge goes up. When the HP runs low, change to a Medic Paradigm and have Vanille heal and switch back to the first strategy. Keep on doing this and the Gestalt Meter will go up
Submitted By: CMC1988
Final Fantasy XIII
Check back for user-submitted Final Fantasy XIII strategy, hints, cheats, or submit your own by clicking here.
Submitted By: GamesRadar
Submitted By: GamesRadar
Final Fantasy XIII Glitches
CP Farming
Entry Location:nautilus park
When playing as Sazh and Vanille after being attacked by those PSICOM soldiers, fight everyone but don't go past the save that leads to the mission marker. There will be 5 or 6 little blue enemies fight them and you will get 650 CP's, then run back to the little blue enemy next to a item container, fight him and then go back to the 6 enemies at the top and repeat.
Submitted By: mcbeanie117
----------------------------------------------------------------------------------------------------------------------------
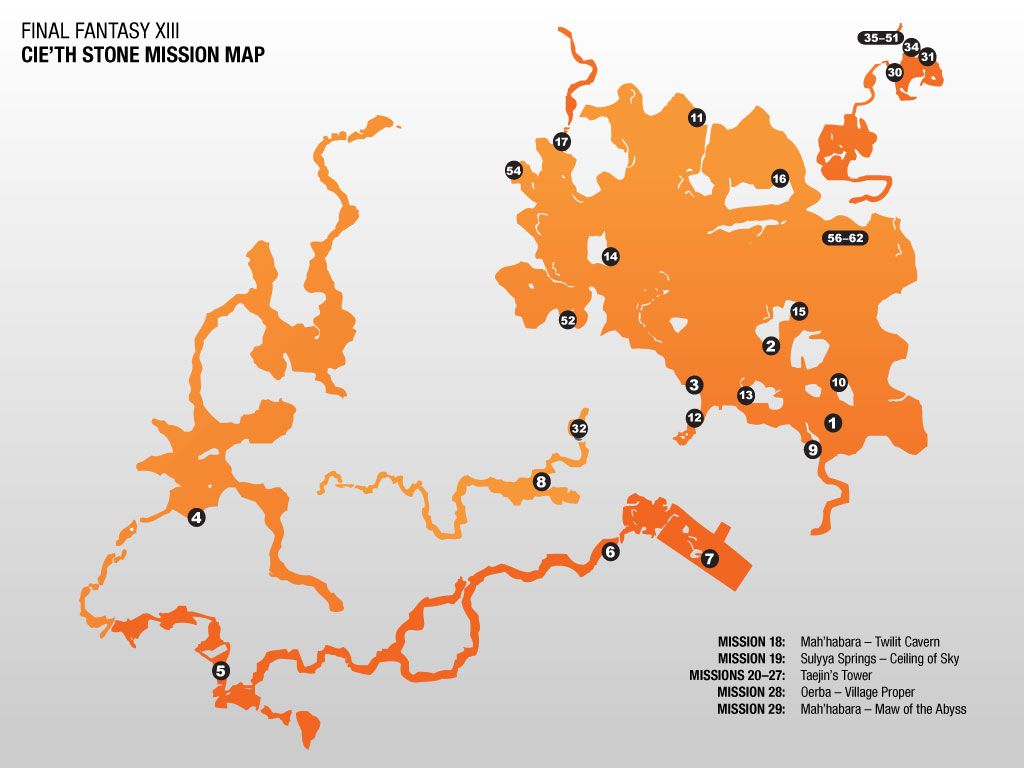
Final Fantasy XIII – Cie'th Stone missions guide
We show you the quickest paths and best strategies for completing all 64 side quests
Congratulations! You’ve exited the tubes of Cocoon and are now experiencing the vast, beautiful environments of Gran Pulse for yourself. But you shouldn’t sit here too long just taking in the view – after all, there’s stuff here. Stuff that needs killing, to be precise.
All around Pulse, you’ll find the remains of fallen l’Cie who failed in their Focus – Focuses that usually involved monster killing. A simple touch will net you their sob stories of not being able to take down a particular beast. Many of these missions are optional, netting you items and equipment as a reward, though some are mandatory for the story, and a few unlock additional game features and sealed-off areas once they have been completed. So why not take some time out and help fulfill the last wishes of the dead for fun and profit?
Skip to:
Missions 1 - 10
Missions 11 - 20
Missions 21 - 30
Missions 31 - 40
Missions 41 - 50
Missions 51 - 60
Missions 61 - 64

Above: Click for larger map
 Rank: D
Mark: Ectopudding
Cie'th Stone location: Archylte Steppe – Central Expanse
Mark location: Archylte Steppe – Central Expanse (beside the pond)
Reward: Energy Sash

Your first mission is a relative pushover. The only thing you really need to look out for with Ectopudding is that he/she/it (do gelatinous blobs have genders?) is completely immune to physical attacks. If you’ve got a strict Commando on your team with low Ravager levels, just have them stick to using Ruin.
 Rank: D
Mark: Uridimmu
Cie'th Stone location: Archylte Steppe – Central Expanse
Mark location: Archylte Steppe – Central Expanse
Reward: Cobaltite

Another relatively simple fight, though a bit tougher than Ectopudding due to the sheer number of enemies. Uridimmu’s got an entire pack of Gorgonopsids with him, and if you’re not careful they can gang up and put a bit of extra hurt on your party members.
 Rank: D
Mark: Ugallu
Cie'th Stone location: Archylte Steppe – Central Expanse
Mark location: Yaschas Massif – Tsubaddran Highlands
Reward: Platinum Bangle

Ugallu’s similar to Uridimmu and his friends, but a lot bigger. He also fights solo, making it considerably easier to concentrate your attacks on him. Fortunately, the percentage you’ll need to achieve to stagger him is pretty low. He’s weak to ice and wind attacks, so set up a party/paradigm with spellcasting skills to help stagger him, then send your Commandos to go to town.
 Rank: D
Mark: Adroa
Cie'th Stone location: Yaschas Massif – Tsubaddran Highlands (teleport)
Mark location: Yaschas Massif – The Ascendant Scarp
Reward: Pearl Necklace

Adroa and his buddies have a very low percentage needed to stagger. Unfortunately, Adroa is resistant or immune to numerous magic skills, making it tough to damage him by any means other than pure melee attacking – so do just that. The little buggers don’t exactly have huge HP reserves, so taking them down shouldn’t be a huge issue. They’ll be using a lot of water magic against you, potentially interrupting your strikes, so plan accordingly.
 Rank: D
Mark: Edimmu
Cie'th Stone location: Yaschas Massif – The Ascendant Scarp
Mark location: Yaschas Massif – Tsumitran Basin
Reward: Sorcerer's Mask

Edimmu has some solid defenses, being immune or resistant to almost every physical or magical attack you can throw at it. Why not send a Saboteur into the mix to help even the odds a bit before going in for the kill? Fortunately, it doesn’t have a huge amount of HP compared to other single-enemy hunts, so with a few debuffs you ought to be able to clip its wings.
 Rank: C
Mark: Munchkin Maestro
Cie'th Stone location: Yaschas Massif – Paddraean Archaeopolis (Waystone)
Mark location: Yaschas Massif – The Pass of Paddra
Reward: Fulmen Ring

The goblin enemies in FFXIII sure look odd, don’t they? This is the first of several missions you’ll be sent on to take down the big(ger) bosses of the goblin tribe. He’s got a few of his lackeys with him when the fight begins – take those little guys out first before focusing your attacks on the Maestro himself. He’s immune to thunder but vulnerable to ice and wind skills, so use those to build up a chain and stagger him.
 Rank: C
Mark: Bituitus
Cie'th Stone location: Yaschas Massif – Paddraean Archaeopolis
Mark location: Yaschas Massif – Paddraean Archaeopolis
Reward: R&D Repot (access to shop)

Bituitus looks a lot like Edimmu, but is considerably stronger in the hit point and chain percentage departments. Fortunately, his defenses aren’t quite as solid as Edimmu: he’s vulnerable to non-elemental Magic strikes. Get some Commandos out on the field and get to Ruining! Keep in mind that he can also inflict Poison status and other debuffs, so you’ll want to swap in a Medic or Synergist from time to time to keep everyone in top form.
 Rank: C
Mark: Rakshasa
Cie'th Stone location: Vallis Media – Base Camp (Waystone)
Mark location: Vallis Media – Atzilut's Tears
Reward: Collector's Catalog

Rakshasa likes to hit pretty hard, and he’s got some slimy buddies on the scene as backup to boot. Take care of the ooze first before aiming to take down their boss. Use thunder spells to help build up a chain (he’s pretty easy to stagger) and keep a Synergist in tow to help offset his various debuff skills. This won’t be the last you’ll see of Rakshasa, either: he’s roaming around some of the later areas you’ll encounter, sometimes in groups, so keep this in mind for your later travels.
 Rank: C
Mark: Kaiser Behemoth
Cie'th Stone location: Archylte Steppe – Central Expanse (Waystone)
Mark location: Archylte Steppe – Central Expanse
Reward: Rhodochrosite

The behemoth enemies in FFXIII have two stages: one on the ground on all four legs, and another that stands upright on their haunches. The latter stage occurs once you’ve reduced the HP of the behemoth past a certain point, and it also restores the creature’s HP to max once it sits up. If you’re careful (i.e. you have the behemoth staggered and launched in the air) you might be able to kill it without it even shifting, making for a much easier fight. If you can, try to land a preemptive strike on the beast and put it in a stagger immediately. If you can’t, well, keep everyone well-buffed and work your magic against him with Earth-elemental spells.
 Rank: C
Mark: Ambling Bellows
Cie'th Stone location: Archylte Steppe – Central Expanse
Mark location: Archylte Steppe – Northern Highplain
Reward: Super Conductor (x4)

Ambling Bellows is what happens when accordions go bad, apparently. Fortunately, he’s got a handful of weaknesses that can be exploited: thunder, water, and earth magic. Physical attacks aren’t going to be as effective, so keep your Ravagers ready to throw whatever they can spare at him and he’ll be humming a different tune soon enough.
For next Mission can find in here thanks'
Missions 1 - 10
Missions 11 - 20
Missions 21 - 30
Missions 31 - 40
Missions 41 - 50
Missions 51 - 60
Missions 61 - 64
source from :http://www.gamesradar.com
All around Pulse, you’ll find the remains of fallen l’Cie who failed in their Focus – Focuses that usually involved monster killing. A simple touch will net you their sob stories of not being able to take down a particular beast. Many of these missions are optional, netting you items and equipment as a reward, though some are mandatory for the story, and a few unlock additional game features and sealed-off areas once they have been completed. So why not take some time out and help fulfill the last wishes of the dead for fun and profit?
Skip to:
Missions 1 - 10
Missions 11 - 20
Missions 21 - 30
Missions 31 - 40
Missions 41 - 50
Missions 51 - 60
Missions 61 - 64
Above: Click for larger map
Mission 01: Pond Scum
Rank: DMark: Ectopudding
Cie'th Stone location: Archylte Steppe – Central Expanse
Mark location: Archylte Steppe – Central Expanse (beside the pond)
Reward: Energy Sash
Your first mission is a relative pushover. The only thing you really need to look out for with Ectopudding is that he/she/it (do gelatinous blobs have genders?) is completely immune to physical attacks. If you’ve got a strict Commando on your team with low Ravager levels, just have them stick to using Ruin.
Mission 02: Goodwill Hunting
Rank: DMark: Uridimmu
Cie'th Stone location: Archylte Steppe – Central Expanse
Mark location: Archylte Steppe – Central Expanse
Reward: Cobaltite
Another relatively simple fight, though a bit tougher than Ectopudding due to the sheer number of enemies. Uridimmu’s got an entire pack of Gorgonopsids with him, and if you’re not careful they can gang up and put a bit of extra hurt on your party members.
Mission 03: Massif Contamination
Rank: DMark: Ugallu
Cie'th Stone location: Archylte Steppe – Central Expanse
Mark location: Yaschas Massif – Tsubaddran Highlands
Reward: Platinum Bangle
Ugallu’s similar to Uridimmu and his friends, but a lot bigger. He also fights solo, making it considerably easier to concentrate your attacks on him. Fortunately, the percentage you’ll need to achieve to stagger him is pretty low. He’s weak to ice and wind attacks, so set up a party/paradigm with spellcasting skills to help stagger him, then send your Commandos to go to town.
Mission 04: A Hero's Charge
Rank: DMark: Adroa
Cie'th Stone location: Yaschas Massif – Tsubaddran Highlands (teleport)
Mark location: Yaschas Massif – The Ascendant Scarp
Reward: Pearl Necklace
Adroa and his buddies have a very low percentage needed to stagger. Unfortunately, Adroa is resistant or immune to numerous magic skills, making it tough to damage him by any means other than pure melee attacking – so do just that. The little buggers don’t exactly have huge HP reserves, so taking them down shouldn’t be a huge issue. They’ll be using a lot of water magic against you, potentially interrupting your strikes, so plan accordingly.
Mission 05: Joyless Reunion
Rank: DMark: Edimmu
Cie'th Stone location: Yaschas Massif – The Ascendant Scarp
Mark location: Yaschas Massif – Tsumitran Basin
Reward: Sorcerer's Mask
Edimmu has some solid defenses, being immune or resistant to almost every physical or magical attack you can throw at it. Why not send a Saboteur into the mix to help even the odds a bit before going in for the kill? Fortunately, it doesn’t have a huge amount of HP compared to other single-enemy hunts, so with a few debuffs you ought to be able to clip its wings.
Mission 06: No Place Like Home
Rank: CMark: Munchkin Maestro
Cie'th Stone location: Yaschas Massif – Paddraean Archaeopolis (Waystone)
Mark location: Yaschas Massif – The Pass of Paddra
Reward: Fulmen Ring
The goblin enemies in FFXIII sure look odd, don’t they? This is the first of several missions you’ll be sent on to take down the big(ger) bosses of the goblin tribe. He’s got a few of his lackeys with him when the fight begins – take those little guys out first before focusing your attacks on the Maestro himself. He’s immune to thunder but vulnerable to ice and wind skills, so use those to build up a chain and stagger him.
Mission 07: Bituitus, the Pillager
Rank: CMark: Bituitus
Cie'th Stone location: Yaschas Massif – Paddraean Archaeopolis
Mark location: Yaschas Massif – Paddraean Archaeopolis
Reward: R&D Repot (access to shop)
Bituitus looks a lot like Edimmu, but is considerably stronger in the hit point and chain percentage departments. Fortunately, his defenses aren’t quite as solid as Edimmu: he’s vulnerable to non-elemental Magic strikes. Get some Commandos out on the field and get to Ruining! Keep in mind that he can also inflict Poison status and other debuffs, so you’ll want to swap in a Medic or Synergist from time to time to keep everyone in top form.
Mission 08: The Eleventh Hour
Rank: CMark: Rakshasa
Cie'th Stone location: Vallis Media – Base Camp (Waystone)
Mark location: Vallis Media – Atzilut's Tears
Reward: Collector's Catalog
Rakshasa likes to hit pretty hard, and he’s got some slimy buddies on the scene as backup to boot. Take care of the ooze first before aiming to take down their boss. Use thunder spells to help build up a chain (he’s pretty easy to stagger) and keep a Synergist in tow to help offset his various debuff skills. This won’t be the last you’ll see of Rakshasa, either: he’s roaming around some of the later areas you’ll encounter, sometimes in groups, so keep this in mind for your later travels.
Mission 09: Heave-ho
Rank: CMark: Kaiser Behemoth
Cie'th Stone location: Archylte Steppe – Central Expanse (Waystone)
Mark location: Archylte Steppe – Central Expanse
Reward: Rhodochrosite
The behemoth enemies in FFXIII have two stages: one on the ground on all four legs, and another that stands upright on their haunches. The latter stage occurs once you’ve reduced the HP of the behemoth past a certain point, and it also restores the creature’s HP to max once it sits up. If you’re careful (i.e. you have the behemoth staggered and launched in the air) you might be able to kill it without it even shifting, making for a much easier fight. If you can, try to land a preemptive strike on the beast and put it in a stagger immediately. If you can’t, well, keep everyone well-buffed and work your magic against him with Earth-elemental spells.
Mission 10: Hollow Hope
Rank: CMark: Ambling Bellows
Cie'th Stone location: Archylte Steppe – Central Expanse
Mark location: Archylte Steppe – Northern Highplain
Reward: Super Conductor (x4)
Ambling Bellows is what happens when accordions go bad, apparently. Fortunately, he’s got a handful of weaknesses that can be exploited: thunder, water, and earth magic. Physical attacks aren’t going to be as effective, so keep your Ravagers ready to throw whatever they can spare at him and he’ll be humming a different tune soon enough.
For next Mission can find in here thanks'
Missions 1 - 10
Missions 11 - 20
Missions 21 - 30
Missions 31 - 40
Missions 41 - 50
Missions 51 - 60
Missions 61 - 64
source from :http://www.gamesradar.com
@
Tagged @ PS3 cheat
Tagged @ RPG game FinalFantasy Series
Tagged @ Top cheat


.jpg)
.jpg)


0 comments:
Post a Comment - Kembali ke Konten